Tuesday, April 28, 2020

Sketchbook Assignment-Change the Scale

Sketchbook/Journal Assignment
ARTS 130-Professor J. Healy
Change the SCALE!

In your Sketchbook/Journal, you are challenged to create an artwork that will use the concept of SCALE. Your work should clearly depict out-of-scale images within a setting. You may make things bigger or smaller or both within the same page.

You may use collage, or draw or paint or work in a mixed media format.

If you wish, you may make more than one for extra credit.

Due May 6, 2020.


Wednesday, April 22, 2020

Accordion Book Cover Images


Frottage Examples


Zoom meeting tonight, Wednesday, April 22 at 6:30 p.m.

The Zoom information was sent to you yesterday!

Make a Cut-Through Page in Your Sketchbook

Sketchbook/Journal Assignment
ARTS 130-Professor J. Healy
Cut Through a Page (or two if you like) to Reveal____?

In your Sketchbook/Journal, you are challenged to create an artwork that will use the idea of cutting through and revealing something else when you  turn the page. Maybe we could look through a window and we see that it seems something is outside, but when we turn the page, we are in for a big surprise.

If you like, you may make this project more than two pages and continue the shenanigans!

THINK OUTSIDE THE BOX. Think surprise. The opening could be a big crack, a door that opens, a cabinet that opens, a monster’s mouth, the pupil of an eyeball, etc., etc.

Due next class.


Wednesday, April 15, 2020

Make a One-Page Zine

Sketchbook/Journal Assignment
ARTS 130-Professor J. Healy
Make a One-Page Zine

In your Sketchbook/Journal, you are challenged to make a one-page Zine depicting “How to Do Something.” It could be how to boil an egg, tie your shoes or use a rotary phone. Whatever. Have fun with your idea. If it takes more than one page, go ahead.

Materials: A sketchbook page or two, a pencil, sharpie marker and optional colored markers, colored pencils or watercolors.

Divide up the page in panels of any size. The format can have only illustrations (and no words), be word-heavy (with speech bubbles, banners or text at the bottom of each panel or a combination of all three. Make it graphic and visual!

Due next class.

Accordion Book Lesson Plan

Accordion Books [K (with some help)- adult]
This is a book arts technique from Japan, that works well for all ages of elementary students. It could be a stand-alone art project or be have a cross-curricular aspect to it.

Aims:
•To create an original book
•To learn about cultural connections (Japan)
•To integrate academic curriculum into your art lessons (optional)

Materials & Tools:
•Scratch paper for planning
•2 pieces of chipboard or heavy cardboard a bit bigger than the folded page size of your book
•white paper cut, folded long (and glued by overlapping if necessary) to make even numbered folded stack with correct number of pages (see below). Rice paper is another, more expensive possibility.
•Paper for covering cardboard covers--4” larger on top and bottom (for an 5" x 5" cover, you’d want 7" x 7” cover paper)
•pencil, eraser, scissors, tape, white glue
•Sharpie markers, watercolors, watercolor brush, water can or colored markers or colored pencils
•Ribbon or string for tying

Procedure:
Decide the theme for your lesson. It could be a book without words, a book about one’s family, a creative story, etc. Have your students work out their stories on scratch paper (4-6 folds is a good number). You need to have a long, folded sheet have 2 more sections than your story, so for a 4-panel story you need six sections and for a 6-panel story you need eight. Keep the numbers even so the book glues together well.
Fold the panels to make equal sections, gluing on extra paper if necessary by overlapping slightly (The seam will disappear once the panel is colored, so don’t worry about it). It might be easier if you give your class the same specifications--say 6 panels for everybody, because then the construction will be the same for everyone.
Draw, sharpie and color the insides as desired.
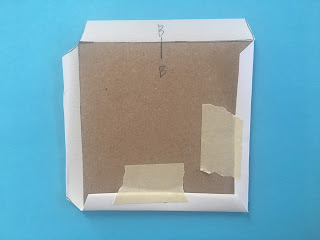
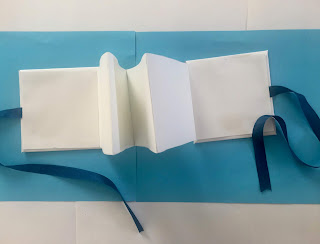
Next, make your covers. The cardboard should be a little bit bigger than our folded pages for the best possible look. Cover the cardboard by cutting your paper 4” each way (2” per side). Draw “envelope” flaps on all four sides, directly from the corners. You are making angled lines going inward on each side--not outward!!!! Cut out the odd-looking corner shapes which will resemble a triangle with a drooping bottom. Fold over each flap and tape down. This side will be the inside of your front and back covers. Tape ribbon on the left side for the cover and the right side for the back. Glue the end “extra” pages over the inside covers, tie your book closed and you have an accordion book.

Variations:
Use other materials such as collage. Books can open up and down, too.

Tuesday, April 7, 2020

Put a Secret on a Page

Sketchbook/Journal Assignment-ARTS 130
Put a Secret on a Page
Professor J. Healy

Grades: 3 and Up

Aims:
To develop creative thinking and problem-solving
To explore mixed media and student choice

Materials and Tools:
Page in sketchbook
Materials and tools of your choice (markers, colored pencils, scissors, glue, etc.)

Vocabulary:
Mixed media, problem-solving

Motivation and Procedure:
If you are teaching this to students, you might open with a class discussion about secrets. How easy is it to keep a secret? If you had to hide a secret in your artwork, how might you do that? One way might be to write down your secret and put it in a sealed envelope which you glue into or hide in a collage. Or you could draw a “Hidden Picture” and put your secret somewhere in your picture or design (if you have every seen Highlights Magazine for kids, you’ll know what this is).

The idea here is to not jump in immediately just to finish this page and get it over with. Think a bit. Mull over various ideas. As you brainstorm with yourself, you will develop your creativity and problem-solving skills.

Make your page extraordinary!

Reflection:
Always share work and try to circle back to your vocabulary and goals.


Monday, April 6, 2020

ZOOM Meeting, April 7

Check your email for details.

130 List of Work Due This Semester

!30 Art Methods List of Work Due This Semester
Professor J. Healy

Name________________________________________ 
Sketchbook Journal:
­­___Name Project (melting, exploding, etc.)
___Story for pop-up book
___Sketches for pop-up book
___Take a Line for a Walk
___Put a Secret in Your Sketchbook/Journal
___Zine Page: How to DO Something
___Cut-Through Page
___Out of Scale Collage
___Covers—collage, painted, mixed media
___Set Design for Your Finger Puppets
___Extra Credit


Assignments:
___Ripped Construction Paper Collage
___Surrealist Collage
___Watercolor/Oil Pastel Resist-2 pages—will be turn into sculpture eventually
___Finished Pop-Up Book (with cover)
___Finished Accordion Book (with covers)
Three Frottage Assignments:
___1-Frottage Picture
___2-Frottage Collages (4-6 pages to be made into accordion book)
___3-Sneaker or Shoe Rubbing and Transformation
___Finished Accordion Book (with covers)
___Styrofoam Print Unprinted Plate
Clay:
___Pinch Pot
___Coil
___Pulled Animal or Figure
___Stuffed Fish
___Paper Sculpture


Sunday, April 5, 2020

Frottage Lesson Plan

Frottage/Frottage Collage/Sneaker Fun

Grades: 2 and Up

Frottage is French for rubbing. This is a printmaking process that is clean!

Aims:
To explore the technique of frottage
To create a thematic print

Materials and Tools:
Paper such as copy paper, bond or fadeless. Thick paper will not work well.
Crayons—Big ones work well.
Texture Plates (available in art stores; one brand name is Shade-Tex)
For Collages: Scissors, glue sticks, phone book sheets for gluing, 12 x 18” colored or black construction (background) paper

Vocabulary:
rubbing, frottage, print, multiple, texture

Motivation:
If you want to show visuals, you can find some rubbings from the Surrealist Max Ernst, who used floorboards and other objects for texture.

Procedure:
Choose your theme. It may be something as easy as shapes or something based on your curriculum, such as animals, cities, the plant world, etc.

Talk with your students about texture and ask where we might find it. Introduce the word “frottage” and explain and demonstrate the process.

Frottage Picture: Have students draw an outline of their idea and outline in sharpie markers. Next, let them find textures around the room (or school) to rub or use texture plates. Each area might have a different texture or else they can use the same texture again and again. You might also try adding a second color over the rubbing without moving the paper or moving it just a bit.

There are many variations to this process, among them:

Frottage Collage: Have your students make many sheets of textures in different colors and patterns. Demonstrate cutting and proper gluing techniques (glue around the edges, not in the middle—unless it’s a small piece; use several phone book pages to do the gluing on, so desks don’t get sticky, letting students crumble up the sheets as they are used.  Next, after giving them the theme, students will cut out shapes and arrange them on construction paper. (Don’t hand out glue right away—let them try different compositions and learn to move pieces around in a thoughtful way. Encourage overlapping!)

Sneaker Rubbing: (Ages 8 and Up) This is a one-period lesson. Students make a rubbing of their sneaker bottom on a large (11 x 17” sheet of copier paper. (They will groan and laugh about “stinky feet” but love this idea in the end! If the student is wearing a shoe without a texture on it, they should “borrow” someone else’s.) Ask them to turn the shape into something such as a car, building, alien, butterfly, etc. They then should make a believable background.

Reflection:
Always share work and try to circle back to your vocabulary and goals. Always be sure to display it if possible.